non-motorised heliostat. The utility of a stationary heliostat (just a big mirror, basically) was was fading even at this point, but I perservered in the pursuit of even marginal sunlight gains. It would be quite easy to procure a large convex mirror and point it towards my wildflower meadow, potentially from an elevated position in some branches.
So, the promise of the heliostat has been well and truly crushed. For my miniature wildflower meadow, I will probably have to limit myself woodland varieties (ie. most shade-loving) - cowslip, columbine, yarrow, knapweed, campion. It's a shame that the most beautiful woodland varieties (bluebells, snowdrops, wood anemone) flower for a very brief period in early spring, so ought to have been planted last autumn!
Soil Type: Slowly permeable seasonally wet slightly acid but base-rich loamy and clayey soils
Soil Texture: Loamy and clayey
Drainage: Impeded
Drains to: Stream network
Carbon: Low
Fertility: Moderate
Landcover: Grassland and arable, some woodland
Habitat: Seasonally wet pastures and woodlands
Cropping: Mostly suited to grass production, some cereal production. Timeliness of stocking and fieldwork is important, and wet ground conditions should be avoided at the beginning and end of the growing season to avoid damage to soil structure. Land is tile drained and periodic moling or subsoiling will assist drainage.
We are on a peculiar spot where the ubiquitous London Clay meets a patch of loamy soil.
This data is from Scoilscape Map, a very useful service provided by the Cranfield Soil and Agrifood Institute, which maps in detail soil types across the UK.
Very interesting from @headspace-hotel:
"A while back I noticed a correlation in the types of plants that don't form mycorrhizal associations. Pokeweed, purslane, amaranth—WEEDS. This makes perfect sense, because weeds are disaster species that pop up in disturbed soil, and disturbed soil isn't going to have much of a mycorrhizal network. But, you know what else is non-mycorrhizal? Brassicas—ie the plant that humans bred into like 12 different vegetables including broccoli and brussels sprouts.
My hypothesis is that these guys were part of a Weed Recruitment Event wherein a common agricultural weed got domesticated into a secondary food crop. I bet the same thing happened with Amaranth. I bet—and this is my crazy theory here—I bet a lot of plants were domesticated not so much based on their use as food, but based on their willingness to grow in the agricultural fields that were being used for other crops."
Here in England, we are still captive to the older generation’s psyche. Nations of fogey gardeners obsessed with dominating nature and turning it into a honeycomb of domestic grass patches and fields of monoculture crops, assaulting anything truly different and diverse. Because true diversity is biodiversity, more species per square km - and they hate it!
"The Fertile Crescent was not always a cruel joke — once upon a time, it was truly fertile. The blasted wasteland we see today is the result of 10,000 years of agriculture. It took only a few centuries to turn the American Great Plains into a dust bowl that is now supported almost solely by petrochemicals. While the rare technological innovation may allow agriculturalists to find new land to replace those they have made infertile — to say nothing of their need to feed their growing population in the “Food Race” — these innovations are few and far between, proving that innovations do not always occur simply because we need them. More often, this requires an expansion of the land under cultivation. This can often mean military conquest of one’s neighbors — the conquests of Rome often listed the need for more agricultural land as the primary motivation quite explicitly — or, it can mean the destruction of wilderness. The destruction of wilderness is especially tempting, because not only does it bring more land under cultivation, it also destroys the habitat of those animals that threaten the agriculturalist’s survival.
This is why agriculturalist belief systems so often posit some theme of “man vs. nature,” or more often, divine permission to use nature as man sees fit. This relationship is necessary to allow for the actions agriculture requires. Agriculture requires the exercise of force against the natural world, and so, agriculturalist religion must find some way to justify that. The adoption of more forager-like religious beliefs about humanity’s place in nature can only be held on any significant scale by those specialists that agricultural production allows to be far-removed from the day-to-day realities of subsistence."
- Jason Godesky
A dipole antenna is an effective and powerful antenna for HF radio bands, such as 10, 15, 20, 40, 80, and 160 meters. However, one of the major problems encountered with a dipole is physical size. The formula 468/F will give the length for any given frequency, but for many the room just isn’t available to put up such an antenna, as for 1.9 megahertz, 260 feet of space is required. If you have this room available to you, then you have the ability to put up a full size antenna which will yield superior results, especially if it can be mounted above 50 feet at the feed point. The inverted L is another very good performer that requires only half the space approx. 125 feet of radiator worked against a ground rod and radial system will provide good performance and is a great DX antenna for 160.
Materials
1 3/8" x 10' hard copper pipe (Cut it in half to make 2 - 5ft radials)
1 1/2" x 10' hard copper pipe (Cut it in half to make 2 - 5ft radials)
2 - 3/8" copper caps
2 - 1/2" copper male adapters14 awg solid core, insulated wire
1 - 1/2" x 5" peice of PVC pipe
2 - 1/2" x 3/4" PVC reducer
2 - hose clamps
1 - 3/4" x 3/4" x 3/4" metal (NOT PVC) conduit body T with cover and weather seal gasket
1 - 3/4" x 4' steel black pipe2 - U Bolts 3/4"wide x 1 1/2" long
2 - U Bolts 1 1/2" wide x 2 1/2" long
1 - 4" x 8" mild steel plate (Or what ever size you need )
50' coax cable RG8X coax cable
solder
electrical tape
1 -PL259 Coax plug connector Or what ever connector your radio needs.
Step 1. Radials
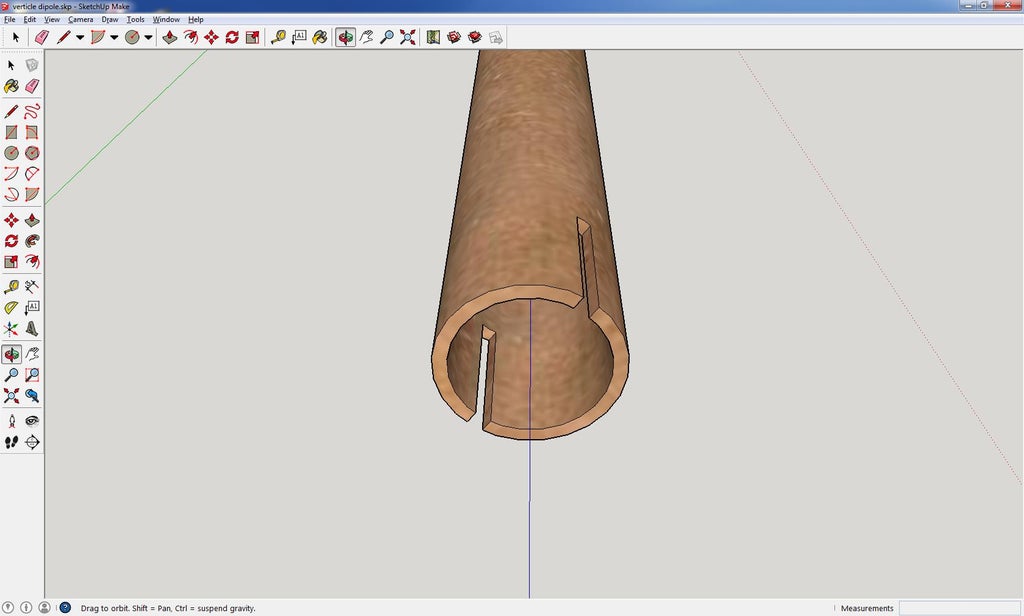
1. Cut 1 inch notches on both sides of the 1/2" copper pipe on one end of each pipe with the hack saw going down the length of the pipe. this creates a compression joint to later put the hose clamps on.
2. Clean the opposite end of the 1/2" copper pipe with emery cloth and the inside joint of the 1/2" male adapters.
3. Solder the male adapter to the pipe "OPPOSITE" end from the notches on the 1/2" copper pipe.
4. Take a 3 to 5" piece of copper wire and strip on end and solder it "INSIDE" the end of the male adapter to create an electrical connection point that will later be connected to the balun. Do not get solder onto the threads of the male adapter.
5. Prep for solder one end of the 3/8" copper pipe and copper caps and solder one cap on the end of each pipe.
6. Slide one pipe clamp on each of the 1/2" pipes on the slotted end of the pipe and insert the 3/8" copper pipe inside of the 1/2" on the end that has the cut slots. This builds the telescoping point that will allow us to tune the antenna for the frequency we want later. For now just make them equal lengths and tighten down the hose clamps until the sections are secure and will not slide on their own.
7. Repeat
Step 2. The T
1. Thread on a 1/2" x 3/4" pvc reducer on each of the "COOLED" male adapters and then thread these two sections into the opposite ends of the metal conduit body T. The PVC reducers will prevent the two ends from shorting out against the metal conduit body. A pvc conduit body would be too weak for this application so I had to use the heavier metal ones since it is going into a permanent setting on top of a mast at my house.
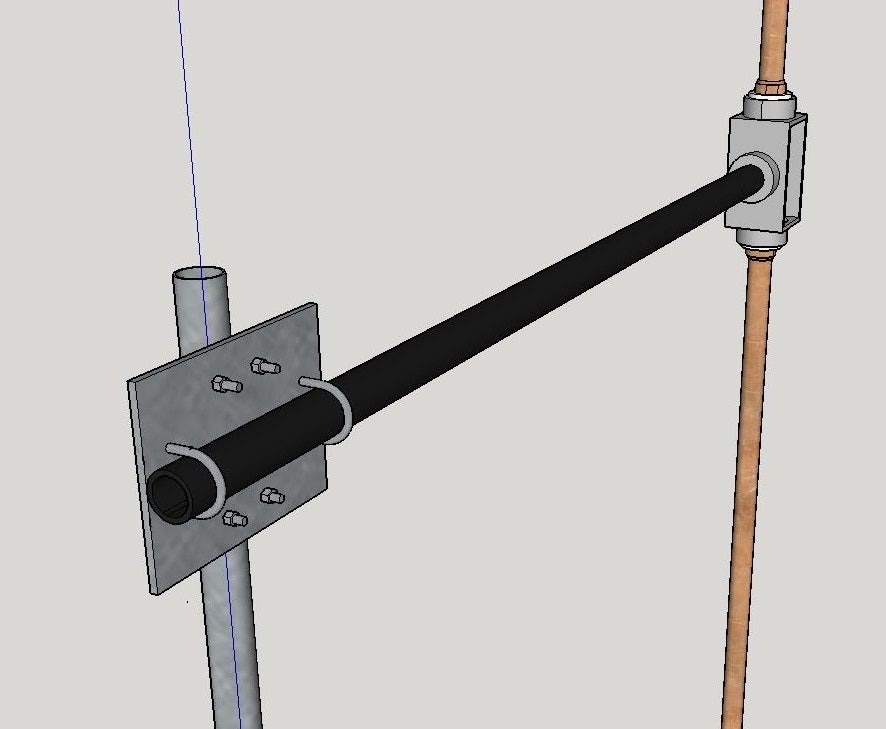
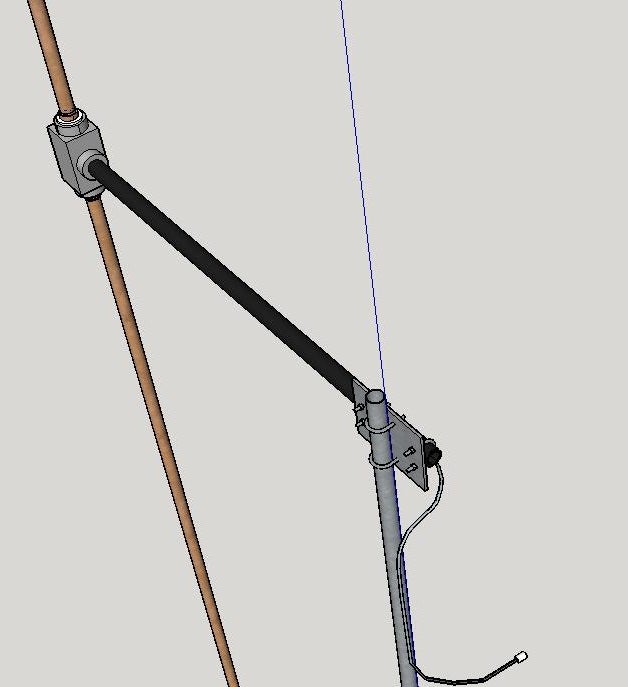
2. Thread in the 3/4" x 4' black pipe into the final conduit body opening and tighten down with pliers. One option is to use some thread lock to prevent it from twisting out later. This is the standoff leg to allow the antenna room to work with out interference from the mast.
Step 3. Antenna Bracket Plate
1. Drill 8 holes the to insert the u bolts in the metal plate. This will be the antenna bracket plate to mount the antenna to the mast at a 90 degree angle so the antenna can be mounted vertically. However you can mount it horizontally if you desire. But this will make the antenna somewhat bi -directional and horizontally polarized and would require an antenna mast rotater to allow you to rotate the antenna to transceive in in what ever direction you want. Horizontally it would transceive somewhat equally in 2 directions with little reception or transmision pointed toward the ends of the antenna. Vertically polarized is preferable.
2. Mount the standoff pipe to the plate with the u - bolts. Later mount this plate to the mast with the 2 remaining u bolts.
Step 4. Assemblage
1. Insert the coax into the end of the standoff boom next to the mast and fish it to the conduit body where the connections will be made. Install your coax connector (PL259) on the opposite end of the coax.
2. Seal the end of the standoff boom where the coax comes in to prevent moisture intrusion with tape or caulk.
3. Make the wire connections and insulate any exposed wire with electrical tape or heat shrink tubing, etc...install the cover plate.
4. Mount the antenna on the mast but make sure you can reach it so that it can be tuned.
Step 5. Tuning
Tuning is done by loosening the hose clamp and pulling out or pushing in the 3/8" pipe section and re-tightening the clamps. But both sides of the antenna must be extended to the same length. Use your measuring tape to make sure both sides are the same. If you have a 1:1 Balun it won't matter which side is the top or bottom element.